To get your mailing list into MortgageWise, you start with a CSV file of your mailing list, and then follow 3 steps. See below for a bit of extra assistance with each step.
PREWORK: Make a CSV file of your mailing list.
The first step is to export a basic CSV (Comma Separated Values) file from your LOS, CRM, or contact file with the data required to mail your newsletters. All you need is the first and last names (separately) of the client(s) and the mailing address. One or both client names is fine. See the image below for an example.
NOTE: If your data export contains more data columns, or the columns you have are out of order, or the columns are named differently than below, don’t worry – – you’ll map just the columns you need, in Step 2!

Here is a bit of help with some of the more common LOS platforms and contact systems. We’ll be adding to this list as time goes on.
OPTIONAL:
MULTIPLE COPIES PER ADDRESS.
If you have contacts in your database that you would like to send multiple copies to (like a Realtor partner), you can manually add a column of data called “Copies” to your database. This allows you to bump the quantity to any recipient to send them multiple copies. Normal clients should just get 1’s.
Note: This process is optional, and skipping this will send 1 copy (the default) to each address.

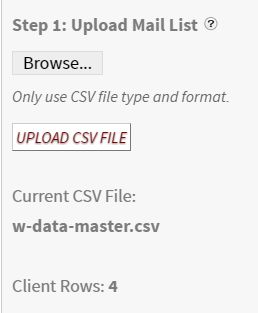
1. UPLOAD YOUR LIST INTO MORTGAGEWISE
In your Control Panel, find the Mailing List control area and click Update Mailing List.
Step 1 has you Upload your Mail List. Again, don’t worry about the header names for each of your columns, or the order of your columns, or even if you have columns you won’t need.
Browse for the CSV file on your computer, and hit UPLOAD CSV FILE.
On successful upload, it will show the name of the Current CSV file and how many client rows of data (i.e., distinct contacts) were uploaded.
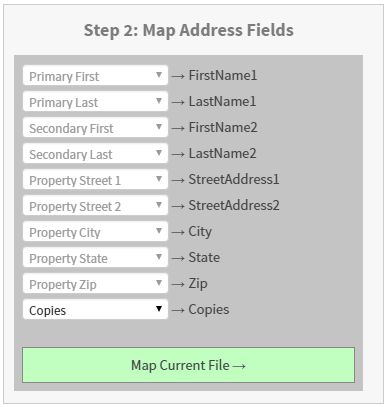
2. MAP YOUR FIELDS TO MORTGAGEWISE
Since your data columns are probably different in name and order to what we need, you simply map them over to ours. If you have extra data columns that don’t apply, you just ignore them.
Work down the column on the left and open each dropdown field. You should see YOUR column headers here. Just pick the one that should map to OUR field name on the right!
If you’re uploading data that includes the optional “Copies” column, map that one here too. Otherwise ignore the last mapping dropdown.
When you’re done, click the big green button that says “Map Current File”
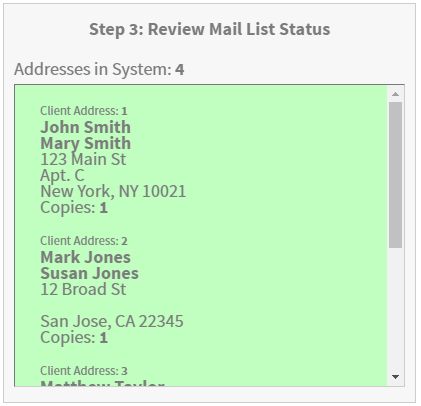
3. REVIEW YOUR UPLOADED DATA
This gives you a chance to see what got uploaded. In the green area in Step 3, you should see each of your client(s) and their addresses and how many copies they should receive (the default is 1, unless you specified more per recipient in the optional Copies column).
Note that there may be an “empty” line if there is no secondary contact name, or if there is no second address line in the mailing address.
Scroll down and review your data.
When you’re satisfied, hit SAVE at the bottom of the page!